Saturday, January 28, 2006

Pineapple Tarts

First attempt at pineapple tarts

Wow, tomorrow's Chinese New Year already. Talk about time flying past. I still recall last year's festivities - ah, all the good food, company and photo taking.

Anyway, I wanted to make a few CNY goodies but didn't have time so I stuck to only one choice: Pineapple tarts. I love pineapple tarts and the crumbly pastry always gets to me. It's so addictive! I have always wanted to make my own and this time, I stood up to the challenge.

I even made my own pineapple jam!:

Pineapple Jam

It's no mean feat, let me tell you that. Cutting whole pineapples, grating them and then standing by the stove, letting it cook and dry. I think it took me about 1 and a half hours to get my nice and sticky pineapple jam. Love the result though. Tastes much better than store bought ones. Or maybe i'm just bias. But I did add a stick of cinnamon and star anise - and it tasted darn good.

Now I know why pineapple tarts always cost so much. It's labourious! First you make the jam, then you make the pastry. After which, you still have to cut out the dough and scoop even amounts of jam and so on... Here's a snapshot that pretty much shows you how it's done:

Baking pineapple tarts

The recipe I used came from The Skinny Epicurean. I guess I was totally inspired by her pineapple tart post. The recipe is simple enough, though I would def. use salted butter next time. The pastry wasn't as tasty as I would have preferred.

Maybe I'll try making thise again next year! :)

Gong Xi Fa Cai ya'll!

Wednesday, January 25, 2006

Island Creamery

Entrance of Island Creamery

We all love ice cream and more so if it comes in our favourite flavours.

After eating chocolate ice cream for so long, it becomes a tad boring at some times so what better way to engage the masses than to offer local flavours? Island Creamery is one such ice cream place that's doing just that.

It used to be located at a corner of Serene Centre. Well it's still in the building but they've just moved next door to a bigger premise. It was a lovely surprise. You see, I visited the place a couple of times last year while it was still at the small corner. I was pleased to see the shift. Look how lovely it looks now!

Interior of Island Creamery

Anyway this place is known for serving ice cream in interesting and local flavours. Think teh tarik and tiger beer sorbet. You can't get these flavours elsewhere i tell you.

Just a few days ago I popped by and saw that they had pineapple tart and pulut hitam flavour. I just had to try them both.

Guess what, they rock!

Pineapple Tart & Pulut Hitam Ice Cream

The taste was simply authentic! You could actually taste and bite into real chunks of pineapple tart (my favorite CNY goodie!). As for the pulut hitam, it was akin to drinking a bowl of the real thing. Fantastic. I know the pineapple tart was made especially for this festive season. I hope they keep it on the menu permanently. The thing about their ice cream is that it's made on the premises everyday and very fresh. Not too expensive too. $4 for double scoop.

What are you waiting for? Time to head down and spoil yourself silly. You deserve it! :)

P.S. They sell ice cream cakes and mud pies too! So you can order your next birthday cake from them.
_______________________________________

Island Creamery
10 Jalan Serene,
Serene Centre
#01-05
Tel: 6468-8859

Monday, January 23, 2006

Ten Random Facts About Me

light balls


Got tagged by strawberry of Scream for Sourcream Timbits for this quirky meme. Yes, I'll have to reveal ten random facts about me. Most of which you might not have known. Let's see, what shall I start with? This is going to be interesting. Hopefully I don't bore you to death! hehe..

1. I wear braces. Yep, but I'll be taking them off pretty soon. It's been more than a year since I've stuck them metal on my teeth. Have gotten used to them actually. And weird thing is, I'm no longer that conscious of my braces. I still smile widely :)

2. My feet's huge. Don't believe me? Go check out what size I wear. It's so difficult finding nice shoes here in Singapore. Why? Because everyone else has such small feet. Okay, I wear UK size 40, or US 10. Now, is that BIG or not? But I think it's because I'm tall, so it pans out all right I guess!

3. I love running and just last year, I completed a full marathon. Though my timing wasn't superb, I'm just glad I didn't give up. It was a painful experience, but a satisfying one as well! I dig the endorphin rush.

4. I'm not your genteel, soft spoken lady. I'm loud, and I'm all for 'roughing it out'. Yep, hey, I go for kick-boxing classes mind you. I am also into wakeboarding, rollerblading, and anything to do with the outdoors.

5. My favourite colour is PURPLE! And NO, it's not a colour for the sexually-deprived!!! It's a royal hue and I love it. Haha, my friends know that well. I have purple everything! :)

6. Currently a Sociology major at a local university, I also have a diploma in Mass Communications from Ngee Ann Polytechnic. I had an enjoyable three years at Ngee Ann where I did everything from photo journalism to radio production and advertising.

7. My childhood dream was to become a renowned writer and publish my written works. I like to think that I'm half way there, considering that I'm a freelance journalist and have also had my poems and essays published.

8. I interviewed original Americal Idol Kelly Clarkson the last time she was here in Singapore. Yes, face to face - she was right in front of me, in the flesh. She's a sweet lass. I love her new album.

9. I actually have some Indian heritage. Quite hard to believe since I don't look Indian, but I guess that's because it's all watered down! hahaa. but I do have very thick eyebrows though. Actually my paternal great grandfather was Indian. My grandfather's part Hainanese and Indonesian Chinese. My mum's side is completely chinese; hainanese to be specific.

10. I'm Roman Catholic and I am completely in love with the one above. I'm also part of this amazing youth ministry called Amplify. We don't belong to any parish; we're under the archdiocese.

There there, ten random facts about me you don't need to know but now know anyway. hehe. allrighty, I'm gonna be real busy churning out CNY goodies and completing my V-day orders so you'll hear less of me. But don't worry, I'm still here! :)

And now, I'm gonna tag:
Jadepearl of Play-play in the kitchen
Sarah of Cooking with the Headhunter
Babe of Babe in the City- KL
Angie of My Kitchen: My Laboratory
X of x-tension

Banana Coconut Cake

Banana Coconut Cake

Birthday cakes are fun to make. That's because you know that you're going to make someone smile, and it just brings a special warmth especially if it's homemade. You know someone had actually put some thought into it and made it with love.

I've made quite a few birthday cakes for friends and relatives and I've always stuck with 'safe' choices like chocolate cake and what not. So this time, when Cass asked me to bake one for the January babies of Amplify, I went for a more tropical feel.

I baked a banana coconut cake. I was very sceptical and worried that it might not turn out good. Haha, that's mostly because I actually used a muffin recipe and simply poured the batter into an 8 inch square pan. Yep. Oh , and I used buttercream icing to make it look snow white, as you can see. I decorated the outside with some dessicated coconut and some colourful sprinkles.

You know what? It didn't taste too bad, though I made the mistake of putting it in the fridge for too long. So it was kinda hard. But other than that, I think it made a pretty interesting cake, for once, although it wasn't as light as I would have liked it to be. Would I make this again? maybe, but as muffins, like they're meant to be :) Here's a slice for you curious readers:

Have a slice of banana coconut cake


Banana Coconut Cake

1 1/4 cups all-purpose flour
1 teaspoon baking powder
1/4 teaspoon salt
2 very ripe bananas, mashed (3/4 cup)
1 stick (1/2 cup) unsalted butter, melted
2/3 cup sugar
1 large egg
1/2 teaspoon vanilla
3/4 cup sweetened flaked coconut

preheat oven to 375°F.

Whisk together flour, baking powder, and salt in a bowl. Whisk together bananas, butter, sugar, egg, vanilla, and 1/2 cup coconut in a large bowl until combined well, then fold in flour mixture until flour is just moistened.

Pour into cake pan and bake until golden or cooked, about half an hour or so.

To get muffins: simple pour the batter into a muffin tin with 8 (1/2-cup) muffin cups and line the cups with liners. Divide batter among lined muffin cups and sprinkle with remaining 1/4 cup coconut. Bake until muffins are puffed and golden, about 25 minutes. Transfer muffins to a rack and cool slightly. Makes 8.

GourmetMay 2004
Epicurious.com © CondéNet, Inc. All rights reserved.

Buttercream Icing

1 lb. powdered sugar, sifted
1/4 lb. (1/2 c.) softened butter
1/8 tsp. salt
1 tsp. vanilla or lemon flavoring
3 to 4 tbsp. milk, half & half, or whipping cream

Cream 1/3 of sugar with butter and salt in large bowl. Blend extract, 2 tablespoons of liquid, and remaining sugar into mixture. Gradually stir remaining liquid into icing until desired consistency is reached.

Yield: Enough for 2 (9 inch) or 3 (8 inch) round layers of 1 (13 x 9 x 2 inch) pan.

Saturday, January 21, 2006

Potato Tuna Croquettes

potato tuna croquettes

Potatoes are simply one of the most versatile foods ever and I love them no matter which way they're cooked. I don't deep fry much but when it comes to croquettes, I make an exception.

Found this recipe in the papers recently and it's different from my other croquette recipe. This one uses tuna and is more like the Malay's bergedel. Anyway cooked this for dinner yesterday and it tasted rather yummy. Try it out why don't you?

__________________________________________________

Potato Tuna Croquettes

3 russet potatoes
2 tbsp oil
1 can tuna (170g) drained
1 onion, chopped
2 cloves garlic, minced
1 tsp chilli powder
1 tsp curry powder
1 to 2 cups bread crumbs
1 egg, lightly beaten
Oil for deep-frying
salt and pepper to taste

Boil potatoes in a pot of water. When they become soft, peel off skin and mash them.

Heat oil over medium-high heat in a pan. Fry onions and garlic until lightly browned. Add tuna, salt, pepper, chilli powder and curry powder, and toss well. Add mash potatoes and mix well.

Roll the tuna mixture into patties. Coat each patty with breadcrumbs, dip into beaten egg and roll again in breadcrumbs.

Heat oil for deep-frying until it's almost smoking. Fry croquettes in batches until they turn golden brown. Lower heat if they brown too soon. Drain croquettes on paper towels and serve hot with tomato or chilli sauce.

Recipe from the 'Today' paper, pg 34, Thursday 29 Dec 2005.

Wednesday, January 18, 2006

Operation 'Cookies for a Valentine'

Jollibean


Aloha my lovely readers. I cannot believe that in just 3 months time, this blog of mine would be 1 year old.

How fast time flies! Plenty of things has changed for me. I'm back in school, running away from the working world for now, but still as passionate about baking and cooking as before. And man, I've tried so many different recipes and opened my eyes to so many different cuisines out there! I have made so many new friends and even gotten lovely parcels from people all over the world thanks to the Blogging By Mail event.

Amazing stuff I tell you.

Right now, I'm in the midst of planning this whole online bakery thing as I've posted before. Well I'm not going to launch it yet, BUT, hey I have a 'preview' prelude thing coming up. I'm sure most of the local readers will benefit from it :)

What am I talking about?

As you all know, Valentine's Day is coming soon. And I've decided to sell some of my baked goods. I've received requests and well it seems from your comments that some of you actually want to buy my stuff if I ever sold them.

So I'm taking a chance and allowing orders to start flowing! :)

I hope I'll be able to pull it off, what with school just re-opening. This being the case, I cannot accept too many orders so I'll limit it to maximum of 3 jars per person.

Now, what am I going to sell? Cookies of course. I'm sure you all have read about the cookies I've baked. Since this if for V-day, I'm going to have some V-day themed cookies and some normal ones you can give your loved ones. Here's what I'm offering:

________________________________________

1. Dried-Cranberry Shortbread Hearts
2. Citrus Cornmeal Shortbread*
3. Snowball Cookies/ Hershey's Surprise Kisses
4. Chocolate Chunk Cookies

*you can request for heart shaped ones.

_________________________________________

There you have it! I will call this Operation 'Cookies for a Valentine'.

From now until the 31st of January to place your orders. Do note that I'm rather flexible so you can make special requests. Like if you just want to have a few HUGE heart shaped cookies instead of a jar of small ones, let me know. Or other customisation you might have in mind. For example, the snowball cookies as you know, come with a hidden Hershey's kiss. You can request for a dark chocolate or milk chocolate kiss. Make sure you specify.

oh yes, pricing-wise, it's SGD$15 per jar except for the snowball cookies - that would be SGD$20. Why is it slightly more expensive? The ingredients my dear. I'd have to get Hershey's kisses won't I? And just to clarify, I only use quality ingredients for all my cookies so don't worry, you'll be paying for good stuff! hahaa... You might be wondering how big one jar is? Here's a photo:

Cookie Jar
Measurements: 5 inches tall, with a diameter of 4 inches.

Please place your orders via email: thebakerwhocooks@gmail.com
Don't forget to leave down your contact details too ya.

Collection date of the cookies will depend on how early you order. I'll probably meet you personally to pass them to you - perhaps somewhere central. Again, I'll confirm details really soon or when I reply to your email.

Forgive me if there are any hiccups along the way. It's my first time doing this online and I'm doing this to test-drive the whole online-bakery idea. Thanks for your understanding and thanks for all the support guys! Really appreciate it! Love ya'll!

P.S. In case you don't fancy cookies or want something that's not on that list up there, and perhaps you just want to savour my other baked goods, do pop me and email and maybe we can work something out! :)

Sunday, January 15, 2006

Hainanese Rice Crispies

Puffed Rice

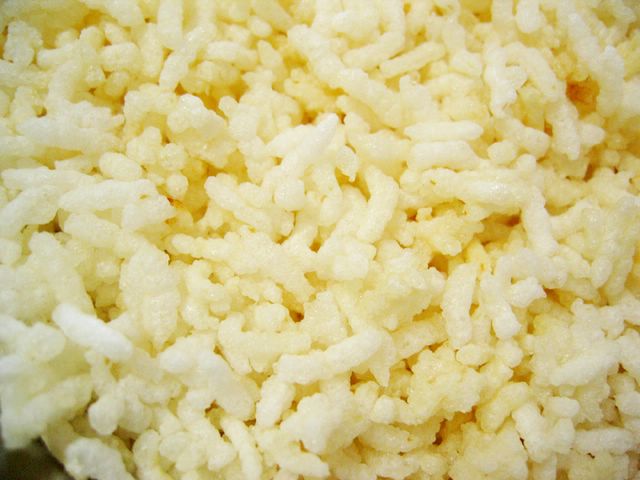
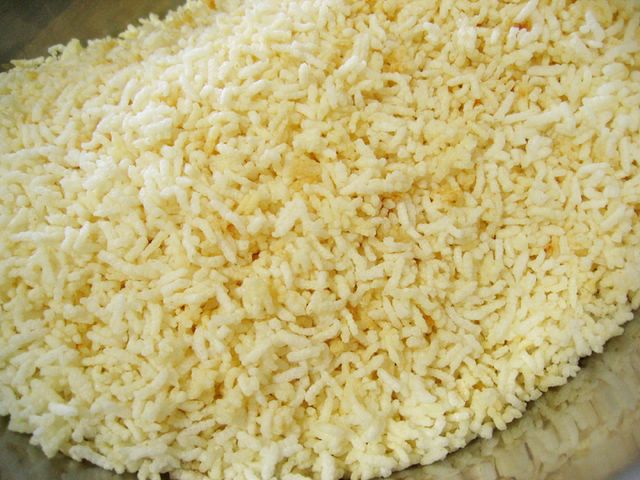
Can you guess what that is?

Yes, it looks puffed up because it is.

Give up?

It's actually rice. Puffed rice to be exact. Think rice crispies and you get my drift.

Some time back, I posted about this snack in a meme I did about Childhood Food Memories and I promised to post about this when my grannie made it for this coming Chinese New Year (CNY).

Now, this isn't your usual rice crispies. The ones my dear grannie makes, they're one of a kind. Till now, I have yet to be able to find it elsewhere. I call it the asian version of the more popular Rice Krispie Cremes and made in a totally different way.

For my family, and for most Hainanese, we call this snack hor gong, or haw kong, it doesn't matter how it's spelt as long as you pronounce it properly. My maternal grandmother used to make them every CNY but for the past 5 years she stopped - simply because it was a labourious effort and she wasn't getting any younger. But this year, she decided to make them again, with the help of 4 of my aunts. As for me, I decided to snoop around a bit and take some photographs. So here I present to you the lady of the show, my maternal grannie!

my maternal grandmother

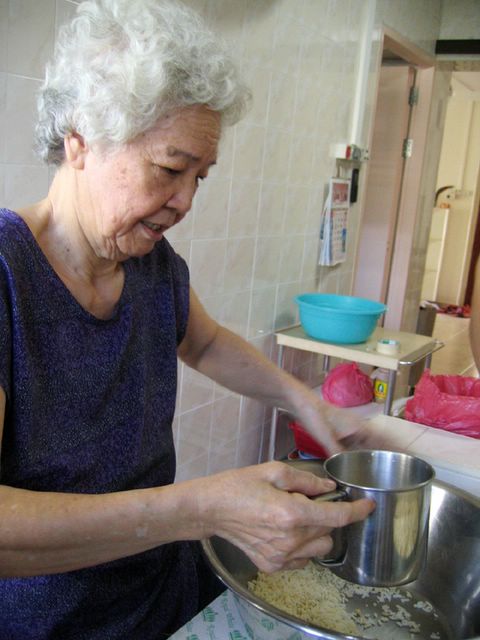
She's busy measuring the amount of puffed rice to use. Mind you, there were so much rice! And puffing them doubles their quantity. You'll understand as you read on.
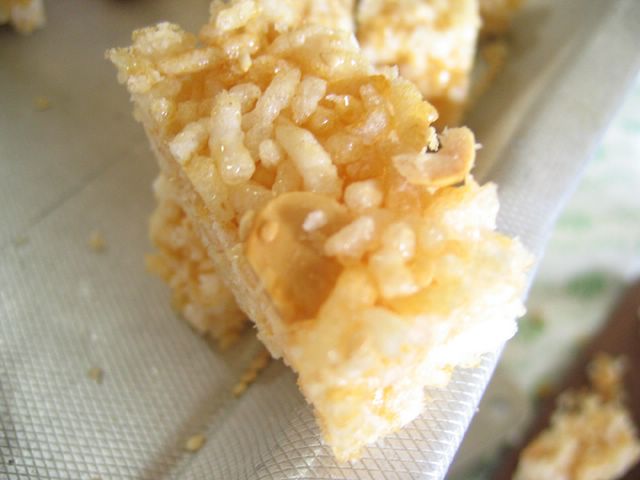
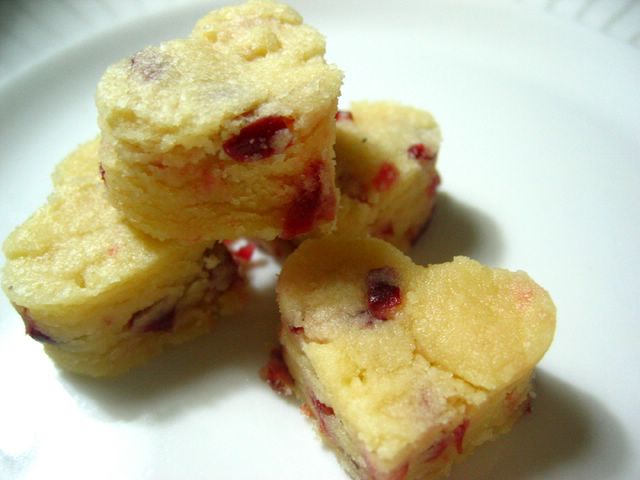
Haw Kong

Here's the hor gong I was telling you about. This is one of my dearest grannie's speciality. She's a darn sweet lady and rather fine as well. She raised 8 daughters up and till this day, she's still strong and active. Very adorable and kind hearted. Love going to her place - only setback is that my Mandarin isn't that good. But it's okay, we can understand each other. I do understand most of the Hainanese dialect they speak; although I can't speak it.

Okay back to the delicious snack...

roasted peanuts

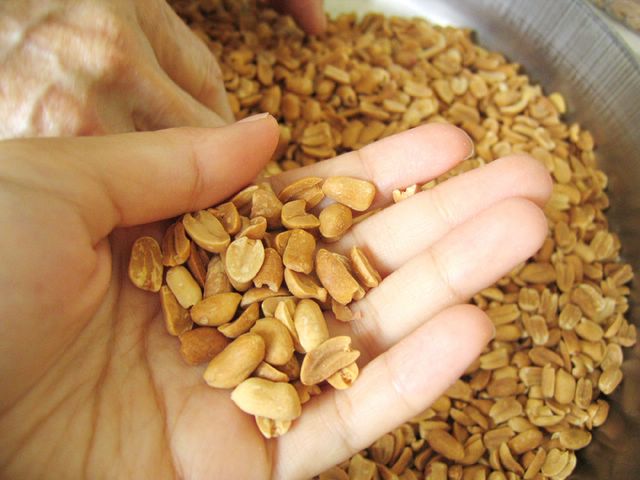
Ahhh roasted peanuts. Hey they didn't just buy them pre-roasted okay. My aunt and grannie roasted it themselves, thus the aroma. Trust me, you'll want to pop some in your mouth after taking a sniff.

Okay, so you have roasted peanuts, and you have:

Puffed rice

Puffed rice. Loads of it. What do you do next?

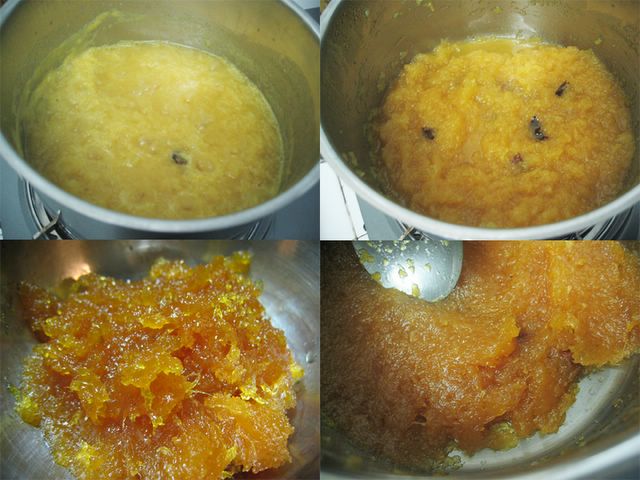
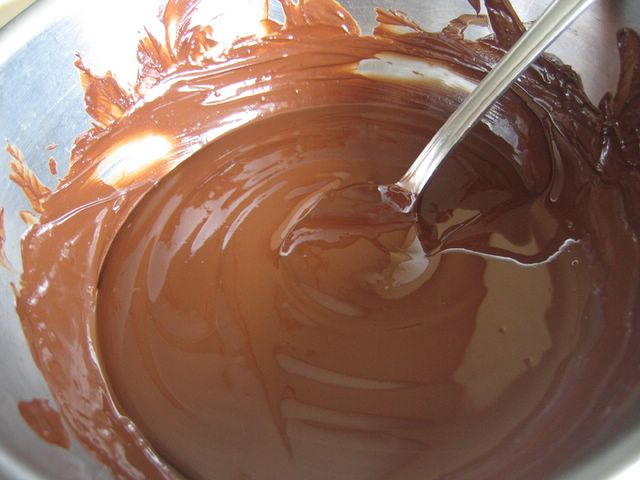
Make some caramel of course....

making caramel

Do note that the caramel contains ginger and lime juice (for that refreshing taste).

It takes skill to ensure you don't over burn the caramel.

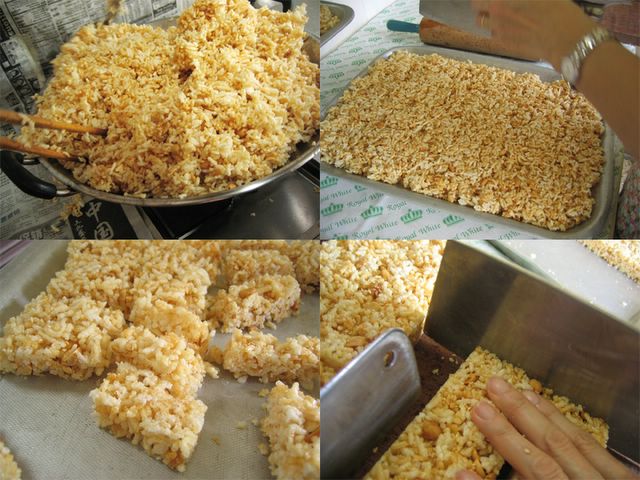
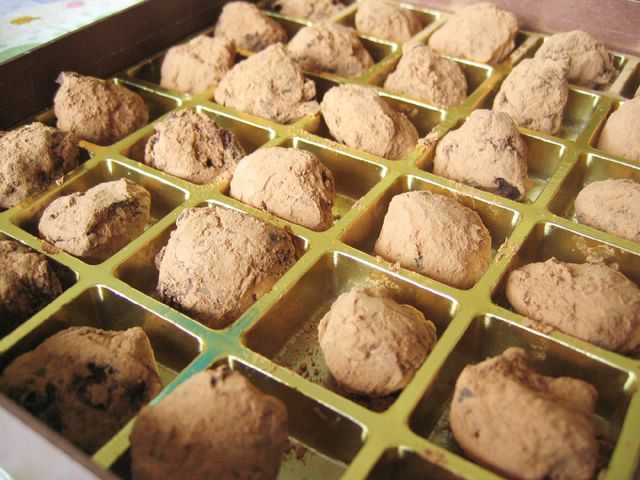
After the caramel's ready, add it to the puffed rice, and throw in some toasted sesame seeds and viola:

Caramel with puffed rice

Okay here's a more detailed picture of how that came about:

Caramel with puffed rice – before and after

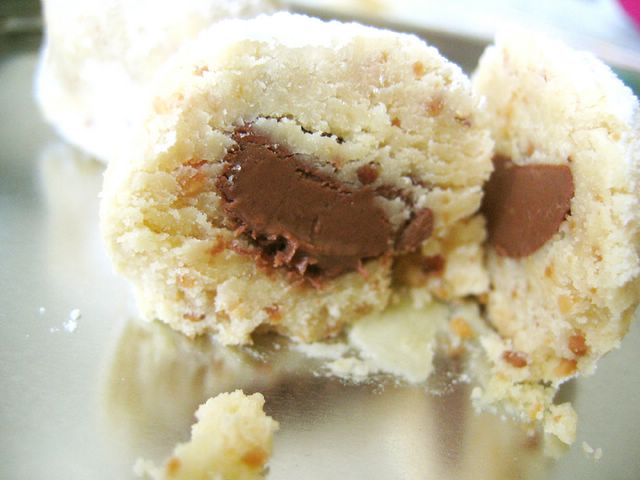
Mix the peanuts with the rice, add to caramel, mix well, place it on trays to cool. Then you slice it!

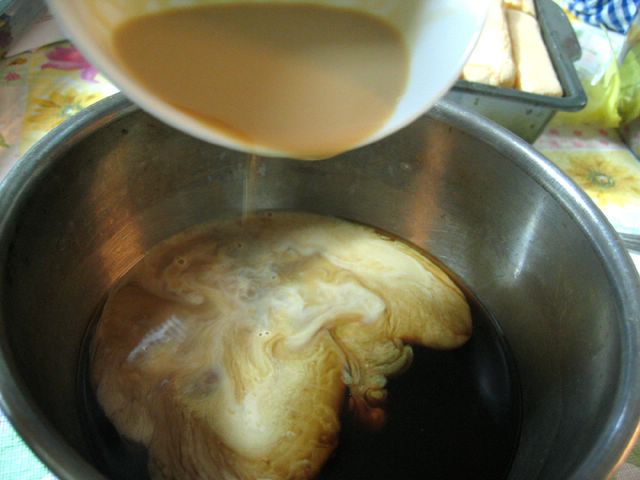
In case you're wondering how the puffed rice is made. I'll show you:

Puffing rice for haw kong

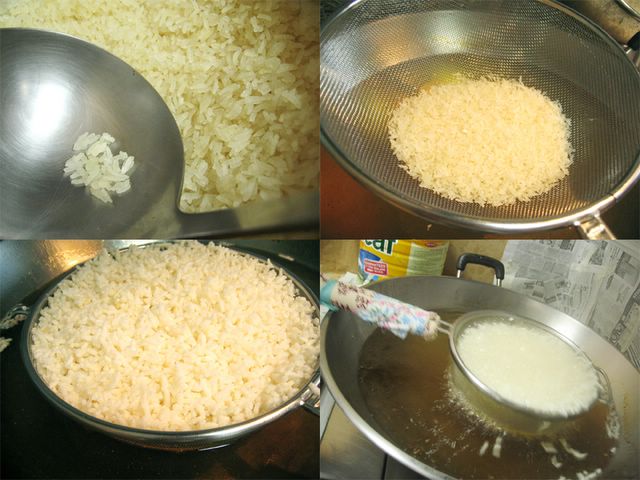
Now, the rice is actually dried under the sun (grannie does it for leftover rice for the entire year, thus the accumulative volume!). It must be really dry or else your rice won't puff.

So you have your dried rice, now, heat up some oil, lots of it, and using a coliander or sieve as you can see, place some rice in it and lower into the oil. The rice puffs up really quick so be careful. Drain all the oil and set aside.

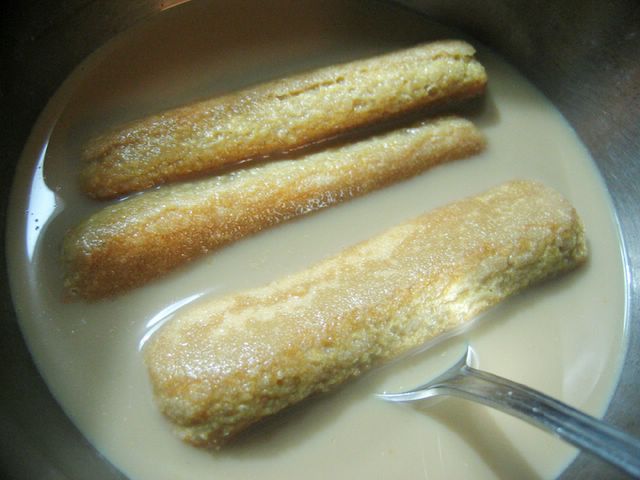
Next, here's another detailed picture of how the rice is added to the caramel, placed in trays and properly sliced:

slicing haw kong

Tadah! My photo essay of sorts on this yummy Hainanese snack is complete.

It was interesting as this was certainly the first time watching my grannie make this. I love hor gong and missed it so much. Boy am I glad she's making it again. I hope to learn from her and maybe make it myself someday.

I'll soon have some tins of those lovely treats so if you want to taste them, come to my place during CNY visting why don't you? hahaa... you won't regret!

Friday, January 13, 2006

Panna Cotta

Making Panna Cotta

I had some left over thickened (heavy/double) cream in the fridge and decided to make another Italian dessert.

I hardly eat Panna Cotta but I do appreciate the smooth slickness of it. It's really creamy and ever so sinful but hey, since when am I someone who cared about the calories? So anyway, I went to consult my trusty Williams-Sonoma Italian cookbook and decided to make some of this dessert myself. You can serve it with strawberries (combine 3 cups of the fruit with 3 tbsp sugar and 1 tsp orange zest, cook over low heat about 3-5 minutes, let cool and refrigerate for up t o6 hours) or do as I do, eat it with some jam. Yes I was too lazy to make the strawberry syrup and all.

Panna Cotta

I didn't have any ramekins so I used a small glass cup.

Panna Cotta with Jam

This is how it looks like, unmolded. Okay I know it doesn't look that chic. Hey I don't have any ramekins. Wait till I get me some, I'll make this again, together with the strawberries. haha. anyway, I finished one serving myself. I feel rather full now... and I haven't had dinner yet! Oops.

____________________________________________

Panna Cotta

2 and 1/2 tsps unflavoured powdered gelatin
2 and 1/2 cups (20 fl 0z/625 ml) heavy (double) cream
1/2 cup (4 fl oz/125 ml) whole milk
1/3 cup (3 oz/90 g) sugar
pinch of salt
1 tsp vanilla extract (essence)

In a small bowl, sprinkle the gelatin over 3 tbsps cold water and stir to blend. Let stand until the gelatin is softened, about 5 minutes.

Pour the cream and milk into a large saucepan. Add the sugar and salt, place over medium heat, and heat, stirring to dissolve the sugar, until bubbles appear along the edge of the pan. Stir in the gelatin mixture and remove from the heat. Set aside to cool slightly, stirring occasionally, about 10 minutes. Stir in the vanilla. Divide among six 3/4 cup (6 fl 0z/180 ml) ramekins. Cover and refrigerate for at least 6 hours or up to overnight.

Makes 6 servings

From Williams-Sonoma Italian Cookbook

Thursday, January 12, 2006

Banana Cake

Banana Cake

Bananas aren't just for monkeys. They're great for people on the go, for anyone who needs energy. Runners love eating bananas before runs, including me of course. I seriously cannot find any fault with this fruit. It's so versatile. We can eat it with ice cream; thus the banana split, we fry it; goreng pisang as the Malays call it, we caramelise it and have it with crepes; yummy, love the one at Marche, we blend it with milk; viola, banana milk shake! Of course there's also banana cake, bread, muffins etc. Most of the time, banana breads and muffins have walnuts in them. Perhaps they go well together and I won't protest.

So anyway, I made myself a banana cake some time back. I can't remember where I got the recipe from but I know that it's really simple and I love that it uses spices. Just mix and pop it in the oven. This cake isn't too overpowering but you might want to add more bananas for a stronger banana taste. Ah, it's quite hard to go wrong when you're using bananas. Lovely stuff i say!

___________________________________________

Banana Cake

2 eggs
1 cup sugar
1 cup sour cream (* I used 1/2 cup buttermilk instead)
1 cup mashed ripe bananas
1 tsp vanilla
2 cups plain flour
2 tsp baking powder
1 tsp baking soda
1/2 tsp salt
1/4 tsp ground cinnamon
1/8 tsp ginger
1/8 tsp ground cloves

Mix first 5 ingredients together and set aside.

Now combine the remaining dry ingredients and stir into wet mixture.

Pop into the oven and bake at 180 degree celcius for about half hour to 45 minutes. Use a wooden skewer and if it comes out clean, it's ready.

Monday, January 09, 2006

Citrus Cornmeal Shortbread

citrus cornmeal shortbread

Do you like crumbly cookies? Or do you prefer the soft melt-in-your-mouth kind? I love both but you know what? There's a certain cookie/biscuit I like better. I really don't know why it's called shortbread when it's not bread at all. Whatever it is, I love how it dissipates slowly in my mouth, at the contact of my tongue. Delightful I say! I have been searching for a good shortbread recipe and I think I might have found it. It's also interesting because it calls for yellow cornmeal:

yellow cornmeal

I got this recipe from the Martha Stewart Holiday Cookies edition. I want to make this for Chinese New Year. So people, if you want to come visit my house, do expect to see lots of these shortbread ya :)

I'm going to plan my list for CNY soon. Any ideas or recipes you want to recommend? Email or leave a comment ya? I'm also looking for a kick ass pineapple tart recipe - the open faced kind, not the 'pillow' one. Thanks guys!

____________________________________________________

Citrus Cornmeal Shortbread

1 cup unsalted butter, softened
3/4 cup confectioners' sugar
2 tsp pure vanilla extract
1 and 1/2 tsp orange zest
2 cups all purpose flour
1/4 plus 2 tbsp yellow cornmeal
1 tsp coarse salt

1. Put butter and sugar in the bowl of an electric mixer fitted with the paddle attachment; mix on medium speed until creamy and smooth, about 2 minutes. Add vanilla and zest. Mix until combined, scraping down sides of bowl as needed. Reduce speed to low. Add flour, 2 tbsp cornmeal, and salt; mix until well combined, about 3 mintues. Halve dough; shape each into a log about 1 and 1/2 inches in diameter. Wrap each in plastic, and refrigerate until cold, at least 1 hour.

2. Preheat oven to 300 degrees Farenheit (150 degree celcius). Place remaining 1/4 cup cornmeal on a sheet of parchment paper. Roll in cornmeal to coat. Cut into 1/4 inch thick rounds, and space them 1 inch apart on a baking sheet lined with parchment paper. Bake until pale golden, 25 to 30 minutes. Cool on sheet on a wire rack. Store in an airtight container at room temperature up to 1 week.

Taken from Martha Stewart's Holiday Cookie Edition 2005.

Sunday, January 08, 2006

Scones

freshly baked scones

As much as I love sweet desserts and chocolates, there's always one thing that'll get my attention despite its plain facade. The English are fond of it and so am I. What's the surprise eh? I do love all things English - that I'll admit. I do love my English Breakfast Tea and Scones! I'm not lying to you... The thought of freshly baked scones, hot from the oven makes me want to run to the nearest bakery. But alas, no bakery near my place sells fresh scones.

And so, I might as well get my fingers workin' and make some myself eh? Well that's what I did. I don't know why I took so long to bake these beauties. But well, having found a rather easy recipe, I do have a feeling I'll be baking these quite often, for storage, in case I might suddenly crave for them again.

yummy scone

The Americans call them 'biscuits' i think. But the thing about scones is that it's neither bread nor cake nor biscuit - to me at least. It's kind of like a mixed-breed. It has a little of everything. Amazing tea delight. By the way, most of the scones are now digesting in my tummy... :)

_______________________________________________

Scones

1 and 3/4 cups all–purpose flour, plus more for rolling
4 teaspoons baking powder
5 tablespoons unsalted butter
5 tablespoons sugar
Scant 2/3 cup milk
1/2 cup currants, optional
1 large egg yolk, lightly beaten, for glaze
Clotted cream and strawberry jam, for serving

Heat oven to 400 degrees F. Line baking pan with a silpat (French nonstick baking mat) or parchment paper. Sift flour and baking powder into a medium bowl. Rub butter and sugar into flour to form a fine crumble.

Make a well in center and add milk and currants. Knead gently together, being careful not to over mix. (Dough will be sticky.)

On a generously floured surface, roll out dough to 3/4-inch thickness. Stamp out 2 1/2-inch rounds with a plain pastry cutter. Transfer to prepared pan and brush tops with egg yolk. Allow to stand for 15 minutes.

Bake until risen and lightly golden on top, 12 to 15 minutes. Remove to a rack to cool. Serve warm with clotted cream and strawberry jam.

Taken from Food Network

Saturday, January 07, 2006

Pick-me-up

Second attempt at Tiramisu

That's my second attempt at this fantastic Italian dessert. Geez, I think i'm hooked! I had some mascarpone cheese left from the previous attempt so I decided to make a second one. Besides, i needed a 'pick-me-up'. Hehe... the Italians sure know how to enjoy life eh?

This time I used sponge cake that I bought from a bakery outside my home. I was simply too lazy to go the distance for some Savoiardi.

Anyway, it tasted good with sponge cake too. Hmmm but I think I put too little Bailey's. Oooo anyway some of you suggested putting Marsala into the zabaglione, or even using Tia Maria in my espresso mixture. You know what? I'm gonna do just that. Haha but I'll have to go buy them first. I have no liquer stash to speak of at home. No one drinks! I only have my sole bottle of Bailey's I bought from the DFS at the airport when coming back from Phuket recently.

With this note, I announce the beginning of my tiramisu project. I'm bent on finding the best recipe yet. Meanwhile, I need more cash... care to donate? It's all for a good cause! HAHA...

Just kidding...

Friday, January 06, 2006

Chocolate Yoghurt Loaf

Chocolate Yoghurt Loaf

Chocolate makes me go weak in the knees. I always have a hard time trying to resist them lest I come down with a sore throat. What's not to love about chocolate? I don't know because I can't ever imagine living without chocolate.

Is there such thing as a healthy chocolate cake then? I would say yes. That's because I chanced upon one such recipe by Debbie, of Words to Eat By. She was also a chocolate lover and wanted something less sinful and viola, she put together an ingenious creation, the Chocolate Yoghurt Loaf. I had to give it a try myself and I was rather pleased with the result. Sure, it might not be as chocolatey as my favourite brownie but hey, this is supposed to be lighter and less indulgent eh? I would use this recipe whenever I'm feeling oh-so-stuffed with too much sweet delights.

_______________________________________

Chocolate Yogurt Loaf

Serves 12

Cooking spray
1 cup all-purpose flour
1/2 t. baking soda
1/2 t. baking powder
1/2 t. salt
1/4 cup dutch-process cocoa
5 T. unsalted butter, softened
3/4 cup sugar
1 t. vanilla
1 large egg
1/2 cup plain nonfat yogurt

Preheat oven to 350 degrees. Spray a loaf pan and dust it with cocoa or flour.

Whisk together the flour, baking soda, baking powder, salt, and cocoa powder and set aside.

Mix the sugar into the butter. Add the vanilla and egg. Mix until uniform. Add about 1/3 of the flour mixture, and mix. Then add about 1/3 of the yogurt, and mix. Do this again, then again. This batter will be stiff, but it should still mix easily. Don’t overmix.

Spread batter evenly into prepared loaf pan, and bake on the center rack of the oven for 35-40 minutes [mine was done in 37]. Test with a cake tester or wooden skewer—loaf is done when tester comes out clean.

Cool in pan on a rack for 30 minutes, then remove from pan and cool thoroughly. When fully cool, wrap the cake well to keep it from drying out.

Recipe courtesy of Debbie from Words to Eat By.

Thursday, January 05, 2006

Bailey's Irish Cream Chocolate Truffles

Lindt dark choc

One of my favourite dark chocolates is the Lindt 70 percent. Sure, it is an acquired taste. These ones hardly have any sweet aftertaste, which is totally fine by me since I rather taste the chocolate more than anything else. So i had to use these when I made some truffles.

Melting Dark Chocolate

Since I was going to bring the truffles to the party, I decided to mix the dark chocolate with my favourite Carrefour baking chocolate which had about 52 percent cocoa content. This was to ensure that my truffles won't be too bitter.

Melted Chocolate

Truffles are easy but messy to make. You'll understand when you try it yourself. Nonetheless, I persevered and with the assistance of dear JF again, I had some very beautiful truffles!

Baileys Truffles

And yes they were a hit at the party. Yum yum. I like them alot myself. But I couldn't taste much of the Bailey's though. I might advise adding more to the mixture but I'm not sure if it'll affect the texture. Who knows? I know I have to make these again, with more Baileys!
__________________________________________________________

Bailey's Irish Cream Chocolate Truffles

1/4 cup Bailey's Irish Cream
12 oz semisweet chocolate chips
1/4 cup heavy cream
1 Tbsp butter
2 egg yolks

Melt chocolate over very low heat. Stir in Bailey's and cream.

Beat egg yolks, stir a small amount of chocolate mixture into eggs, then slowly add the eggs to the chocolate mixture. Mixture will thicken. Add butter.

Refrigerate overnight, or several hours.

Using two large spoons or a small ice cream scoop, form small balls

Roll in powdered sugar, then cocoa. The brand of cocoa with chocolate bits works nicely.

Wednesday, January 04, 2006

Tiramisu

Baileys and Espresso

What do you get when you mix black and white? As seen above, you might come up with something that tastes phenomenal. Yep, that's bailey's with espresso. And I'm sure you'll know what happens next:

Soaked fingers

Soaking spongefingers in liquer and coffee is a must for any tiramisu. The alchoholic ones that is. I love tiramisu. In fact, I adore it. I can't remember when exactly did my infatuation with this Italian headturner come about. But I do know that I like a good Tiramisu and I was bent on learning how to make one. I've heard it was time consuming so I put off making it, until NYE. I wanted to make something that'll blow people away at the party. So I decided on my favourite Italian dessert and headed off to get some spongefingers:

Savoiardi

There are many ways to make Tiramisu but this time, I followed a recipe found in one of my William-Sonoma Italian cookbook (given to me by good 'ol Mike, thanks mate!). Some people use spongecake but this recipe called for sponge fingers, a.k.a. lady fingers, or as the Italians call it: Savoiardi. You can find this in Carrefour. They look like this:

Ladyfingers

Oh by the way, the recipe calls for heavy cream, and I tried looking for that in Carrefour but only found whipped cream and thickened cream. I gave my aunt a call and she told me that thickened cream is the same as heavy/double cream. So I bought the Bulla Thickened Cream.

Anyway to cut the long story short, I would say it was a challenge, this Tiramisu. I didn't have enough liquid to soak all the lady fingers so I had to make a second batch. I think I know why. One thing to note when making this - don't soak the fingers too long. You want them just damp, not dripping with liquid. This will cause your tiramisu to be watery at the bottom. Mine was a little, but my friends loved it. In fact, one even commented that it's much better this way but that's because he didn't like his too dry.

Hmm... This won't be my last time trying out a Tiramisu. There'll be plenty more chances. The remaining mascarpone cheese is still sitting in my fridge. Anyone care to contribute a recipe so I could use it up?

My homemade Tiramisu

__________________________________________________

Tiramisu

Ingredients
1/2 cup (4 oz/125g) sugar
2 cups (16 fl oz/500 ml) freshly brewed espresso
3 tablespoons dark rum
45 ladyfingers or savoiardi

For the filling:
6 large egg yolks
1/3 cup (3 oz/90g) sugar
1/2 cup (4 fl oz/125 ml) heavy (double) cream
1 and 1/2 cups (12 oz/375 g) mascarpone cheese
1 and 1/2 teaspoon vanilla extract (essence)

unsweetened cocoa powder for garnish

Method:
In a small saucepan over medium heat, combine the sugar and 1/2 cup (4 fl oz/125 ml) water and cook, stirrin frequently, until the sugar dissolves. Remove from the heat, stir in the espresso, and let cool to room temperature. When the espresso mixture has cooled, stir in the rum

Pour the espresso mixture into a wide, shallow bowl. Working in batches, briefly immerse the ladyfingers in the liquid. Using a spatula, transfer the ladyfingers to a plate. Set aside

To make the filling, in a heatproof bowl, whisk together the egg yolks and sugar until the sugar has dissolved and the mixture is pale yellow and light in texture, about 2 mintues. Place the bowl over a saucepan containing barely simmering water, or transfer to the top pan of a double boiler set over barely simmering water. Using a handheld mixer on medium speed, beat the yolk mixture until very thick, about 6 minutes. Remove from the heat and set asie to cool, stirring frequently.

Meanwhile, in a bowl, using the mixer on medium-high spped, beat the cream until stiff peaks form when the beaters are lifted.

Add the mascarpone and vanilla to the yolk mixture. Beat with the mixer on medium speed until smooth and well blended. Using a large rubber spatula, fold in the whipped cream.

To assemble, use a metal spatula to transfer 15 soaked ladyfingers to a 9-inch (23 cm) square cake pan. Arrange them in a singer layer in the bottom of the pan. Using the rubber spatula, evenly spread one-third of the filling over the ladyfingers. Place another layer of 15 ladyfingers over the filling in the pan and evenly spread with half of the remaining filling. Top with the remaining ladyfingers and filling, again spreading evenly.

Gently tap the pan against the counter to settle the ingredients. Cover with plastic wrap and refrigerate for at least 6 hours or overnight.

To serve, run a thin knife around the inside of the cake pan to loosen the cake. Sift a dusting of cocoa over the top. Cut into slices and serve.

Note: Ladyfingers - light, flat cookies that are as long as a finger - are available in many food stores and bakerires. Savoiardi, the Italian version of these delicate sponge cakes, are sold in specialty-food stores and by mail order. This dish includes eggs that are only partially cooked.

**Note from the baker: You can use Bailey's (like I did) and if you're in Singapore, you can find Savoiardi at Carrefour, under the biscuits section.

Recipe from Williams-Sonoma Italian cookbook

Tuesday, January 03, 2006

Japanese Curry

Vermont Curry Mix

Being a chilli-lover, I found it hard to comprehend the unique qualities of Japanese Curry. Those who've tasted it would know exactly what I'm talking about. I have no idea why they call it curry when it lacks that spicy kick. I used to think all curries had to be spicy but now I know otherwise.

I soon learnt to like Japanese Curry. Why? Because of it's simplicity and sweet thickness. Usually cooked with potatoes, carrots, onions and meat, it's so easy to make - when you use a curry mix that is. I love how thick it gets and pouring it all over my rice/noodles really gets to me. I love seeing that thick brown sauce covering something plain and making my meal so much more appealing.

So I had to try making Japanese Curry myself and I went to buy myself the Vermont Curry Mix by House brand. I think it's from Japan? Anyway I got the mild one, which had a hint of apple and honey. Perfect. This is how the curry pieces look:

Curry Pieces

I made this dish on a Saturday afternoon and let me tell you how easy it is! All you have to do is to cook the meat, potatoes, carrots and onions, add water and the mix, and viola!

Japanese Curry

You'll get lovely Japanese Curry! You can have it with rice or pasta but I went for something different:

Apricot Couscous

I made Apricot Couscous. Why? Because I love couscous. I think it goes well with curries! Thank God my sis and JF liked it. They lapped it up nice and good :)

Apricot Couscous with Jap Curry

There you have it! Easy to make Japanese Curry and Apricot Couscous! Yummy.....

____________________________________________________________

Japanese Curry

1 box House Vermont Curry Sauce Mix (or any other brand)
500 g meat (beef, pork, chicken)
4 medium onions (800 g)
4 medium potatoes (600 g)
1 medium carrot (200g)

Method:
Cut meat, onions, potatoes and carrot into bite size pieces.

Saute in saucepan until lightly browned. Add 5 and 3/4 cups (1400 ml) water and bring to boil. Cook over low to medium heat about 20 minutes, or until tender.

Remove from heat. Break curry sauce mix into pieces and add to saucepan.

Cook over low heat about 20 minutes, or until curry thickens. Serve over cooked rice or pastas.

*When using a half packet, please add half the amount of ingredients mentioned on the package and 3 and 1/2 cups (approx 850ml) water.

______________________________________________________________

Apricot Couscous

Making couscous in a traditional couscousiere is time-consuming, but gives incredibly fluffy results. Making instant couscous in a pan is simple, but yields clumpy results. This method splits the difference: it?s easy and you get much lighter couscous.

2 cups dry couscous
1/2 cup diced dried apricots (preferably Turkish)
3 cups boiling water
1 teaspoon salt

In a medium-size baking dish, stir together couscous and apricots. Mix boiling water and salt in a measuring cup. Pour over couscous, and immediately cover the dish with foil. Let stand until liquid is absorbed, about 5 minutes. Remove foil, and fluff couscous with a fork.

If you need to keep it warm, place couscous in a low oven until ready to serve.

Copyright © 2003 Television Food Network, G.P., All Rights Reserved

Monday, January 02, 2006

Mac & Cheese

Cheesesauce?
mixing the cheese sauce. really tricky. stir constantly or else you'll get burnt cheese bits at the bottom

Most people might scream and run at the sight of cheese, with the thought of the amount of fat content it has. But hey, a little fat won't kill ya will it? I love cheese and I decided to bake Macaroni and Cheese for the NYE potluck at Claire's place. I've made mac and cheese a couple of times before but this time, I wanted to try out a differerent recipe so I checked out Epicurious.

Lo and behold, after a few hours on the afternoon of NYE, and with the help of Francis, I made this mac & cheese. It's pretty easy to make actually. The cheese wasn't too overpowering; and oh I omitted the pepper, mustard and spicy stuff because I wasn't sure if the crowd would like it. And I used normal cheddar.

Pouring the cheesesauce
pouring the sauce over the macaroni

Homemade Mac & Cheese
after sprinking the topping, ready to go into the oven

Baked Mac & Cheese
a close-up shot of the baked mac and cheese. yummy!

Now I know why the recipe mentioned increasing the crunchy topping. It's super yummy! The crust is the best part. Do try it... :)

_______________________________________


MACARONI AND CHEESE

For those who prefer macaroni and cheese with a greater ratio of crunchy topping to creamy center, we suggest dividing the macaroni and cheese between two 3-quart shallow baking dishes and doubling the topping recipe, dividing it between the baking dishes.

3/4 pound elbow macaroni
For topping
2 tablespoons unsalted butter
2 cups panko* (Japanese bread crumbs) or coarse dry bread crumbs
1 cup coarsely grated extra-sharp Cheddar (about 4 ounces)

For cheese sauce
3 tablespoons unsalted butter
3 tablespoons all-purpose flour
1/2 teaspoon dried hot red pepper flakes
2 3/4 cups whole milk
3/4 cups heavy cream
4 cups coarsely grated extra-sharp Cheddar (about 1 pound)
2 teaspoons Dijon mustard
1 1/2 teaspoons salt
1/4 teaspoon freshly ground black pepper

Preheat oven to 400°F. and butter a 3-quart shallow baking dish. Fill a 6-quart kettle three fourths full with salted water and bring to a boil for macaroni.
Make topping: Melt butter and in a bowl stir together with panko or regular bread crumbs and Cheddar until combined well. Topping may be made 1 day ahead and chilled, covered.

Make sauce: In a 5-quart heavy saucepan melt butter over moderately low heat and stir in flour and red pepper flakes. Cook roux, stirring, 3 minutes and whisk in milk. Bring sauce to a boil, whisking constantly, and simmer, whisking occasionally, 3 minutes. Stir in cream, Cheddar, mustard, salt, and pepper. Remove pan from heat and cover surface of sauce with wax paper.

Cook macaroni in boiling water until al dente. Reserve 1 cup cooking water and drain macaroni in colander. In a large bowl stir together macaroni, reserved cooking water, and sauce. Transfer mixture to baking dish.

Sprinkle topping evenly over macaroni and bake in middle of oven 20 to 25 minutes, or until golden and bubbling.

*Available at Asian markets and some specialty food shops and supermarkets and by mail order from Uwajimaya, (800) 889-1928.

Makes 6 (main course) servings.

Gourmet
February 1998

Powered by Blogger


Tell me when this blog is updated

what is this?


Site Meter